> For the complete documentation index, see [llms.txt](https://docs.caf.io/llms.txt). Markdown versions of documentation pages are available by appending `.md` to page URLs; this page is available as [Markdown](https://docs.caf.io/caf-docs/user-guide/organizations/sso-configurations.md).
# SSO Configuration
Configure Single Sign-On (SSO) in the Organizations admin console.
The **Authentication** screen lets you configure Single Sign-On for your organization. With SSO enabled, members sign in with corporate credentials from your identity provider instead of a separate Organizations password.
{% hint style="warning" %}
**Important:** Organizations supports **Service Provider-initiated (SP-initiated)** login only. Members open your organization URL (for example, `https://certta.sso.caf.io`) and choose **Sign in with SSO**. Identity Provider-initiated (IdP-initiated) login — opening Organizations directly from the provider portal — is not supported.
{% endhint %}
***
## Who uses SSO
| Role | Sign-in URL | Method |
| --------------- | --------------------------------------------- | ---------------------------------------------------------- |
| **Super Admin** | `https://{your-alias}.sso.caf.io/admin-login` | Email and password — does **not** use **Sign in with SSO** |
| **Member** | `https://{your-alias}.sso.caf.io` | **Sign in with SSO** when SSO status is **Active** |
Configure SSO in the admin console as a Super Admin. Validate the member experience in a separate browser session at the organization URL.
***
## Supported Providers
Organizations integrates with identity providers that support `SAML 2.0` or `OpenID Connect` (`OIDC`).
| Provider | Protocol | Documentation |
| ----------------------------- | --------------- | ----------------------------------------------------------------------------------------------------------------------------------------------------------------------------------------- |
| Microsoft Entra ID (Azure AD) | `SAML` / `OIDC` | [SAML guide](/caf-docs/user-guide/organizations/sso-configurations/microsoft-entra-id.md) · [OIDC via Generic Provider](/caf-docs/user-guide/organizations/sso-configurations/generic.md) |
| Okta | `SAML` / `OIDC` | [Configure Okta](/caf-docs/user-guide/organizations/sso-configurations/okta.md) |
| Auth0 | `SAML` / `OIDC` | [Configure Auth0](/caf-docs/user-guide/organizations/sso-configurations/auth0.md) |
| Google Workspace | `SAML` | [Configure Google Workspace](/caf-docs/user-guide/organizations/sso-configurations/google.md) |
For other providers, use the [Generic Provider Configuration Guide](/caf-docs/user-guide/organizations/sso-configurations/generic.md).
***
## How SSO authentication works
Organizations uses a federation broker between your identity provider and the member sign-in experience. When you copy **Entity ID**, **ACS URL**, or **Redirect URI** from the **SSO** tab, you register **broker endpoints** in your corporate IdP — not the organization login URL.
```mermaid
sequenceDiagram
participant Member
participant Org as Organizations
{alias}.sso.caf.io
participant Broker as Federation broker
participant IdP as Corporate IdP
Member->>Org: Open organization URL
Member->>Org: Sign in with SSO
Org->>Broker: /api/auth/sso/authorize
Broker->>IdP: Redirect to corporate login
IdP->>Broker: SAML assertion or OIDC tokens
Broker->>Org: /api/auth/sso/callback
Org->>Member: Active session
```
| Step | What happens |
| ---- | -------------------------------------------------------------------------------------------------------------------------------------------------------------- |
| 1 | The member opens `https://{alias}.sso.caf.io` and selects **Sign in with SSO**. |
| 2 | Organizations redirects the browser to the federation broker with your organization's IdP configuration. |
| 3 | The member authenticates at the corporate IdP (Okta, Entra ID, Auth0, Google Workspace, etc.). |
| 4 | The IdP responds to the **ACS URL** (SAML) or **Redirect URI** (OIDC) shown in **Properties** — these point to the broker, not to your organization subdomain. |
| 5 | The broker completes the exchange and Organizations creates the member session. |
{% hint style="info" %}
**SP metadata** (Entity ID, ACS URL, Redirect URI) is available in **Properties** before you save SSO configuration. Copy these values first, then configure your IdP application.
{% endhint %}
For SCIM-based provisioning, see the [SCIM Provisioning Guide](/caf-docs/user-guide/organizations/scim-provisioning.md).
***
## Recommended setup order
Follow this sequence for a complete SSO rollout:
1. **People** → **Groups** — create organization groups and attach **roles** and **linked account** access. Group assignment rules target these groups. See [Create a role](/caf-docs/user-guide/organizations.md#roles) and [Create a group](/caf-docs/user-guide/organizations.md#groups) in the Organizations overview.
2. **Security** → **SSO** — copy **Properties** (SP metadata) and configure your IdP application using a [provider guide](#supported-providers).
3. **Security** → **SSO** — save provider settings and confirm status **Active**.
4. **Security** → **Attribute mapping** — map IdP claims (defaults listed in [Step 3](#step-3-configure-attribute-mapping)).
5. **Security** → **Group rules** — define rules **only when SCIM is not active** (see [Member provisioning](#member-provisioning)).
6. **Security** → **SCIM** — optional; generate a token if your IdP must provision users before login ([SCIM Provisioning Guide](/caf-docs/user-guide/organizations/scim-provisioning.md)).
7. Test **member** login at `https://{alias}.sso.caf.io` in a private browser window.
***
## Authentication Protocols
{% tabs %}
{% tab title="SAML" %}
**Security Assertion Markup Language**
* `XML`-based protocol for exchanging authentication data
* Common in corporate environments
* Configure the provider using **Entity ID** and **ACS URL** from Organizations, then paste the provider **Metadata URL** or **Metadata XML** in Organizations
{% endtab %}
{% tab title="OIDC" %}
**OpenID Connect**
* Modern protocol based on `OAuth 2.0`
* Uses `JWT` tokens for authentication
* Configure **Client ID**, **Client Secret**, **Issuer URL**, and **Authorization scopes** from your provider
{% endtab %}
{% endtabs %}
***
## Prerequisites
* **Super Admin** access in the Organizations admin console
* Administrator access to your identity provider
* Provider compatible with `SAML 2.0` or `OpenID Connect` / `OAuth 2.0`
* **Groups created** in **People** → **Groups** when you plan to use group assignment rules
***
## Step 1: Open Authentication Settings
1. Sign in to the admin console as a **Super Admin** at `https://{your-alias}.sso.caf.io/admin-login` using your email and password.
2. In the sidebar, open **Security**.
3. Select the **SSO** tab.
***
## Step 2: Enable SSO and Configure the Provider
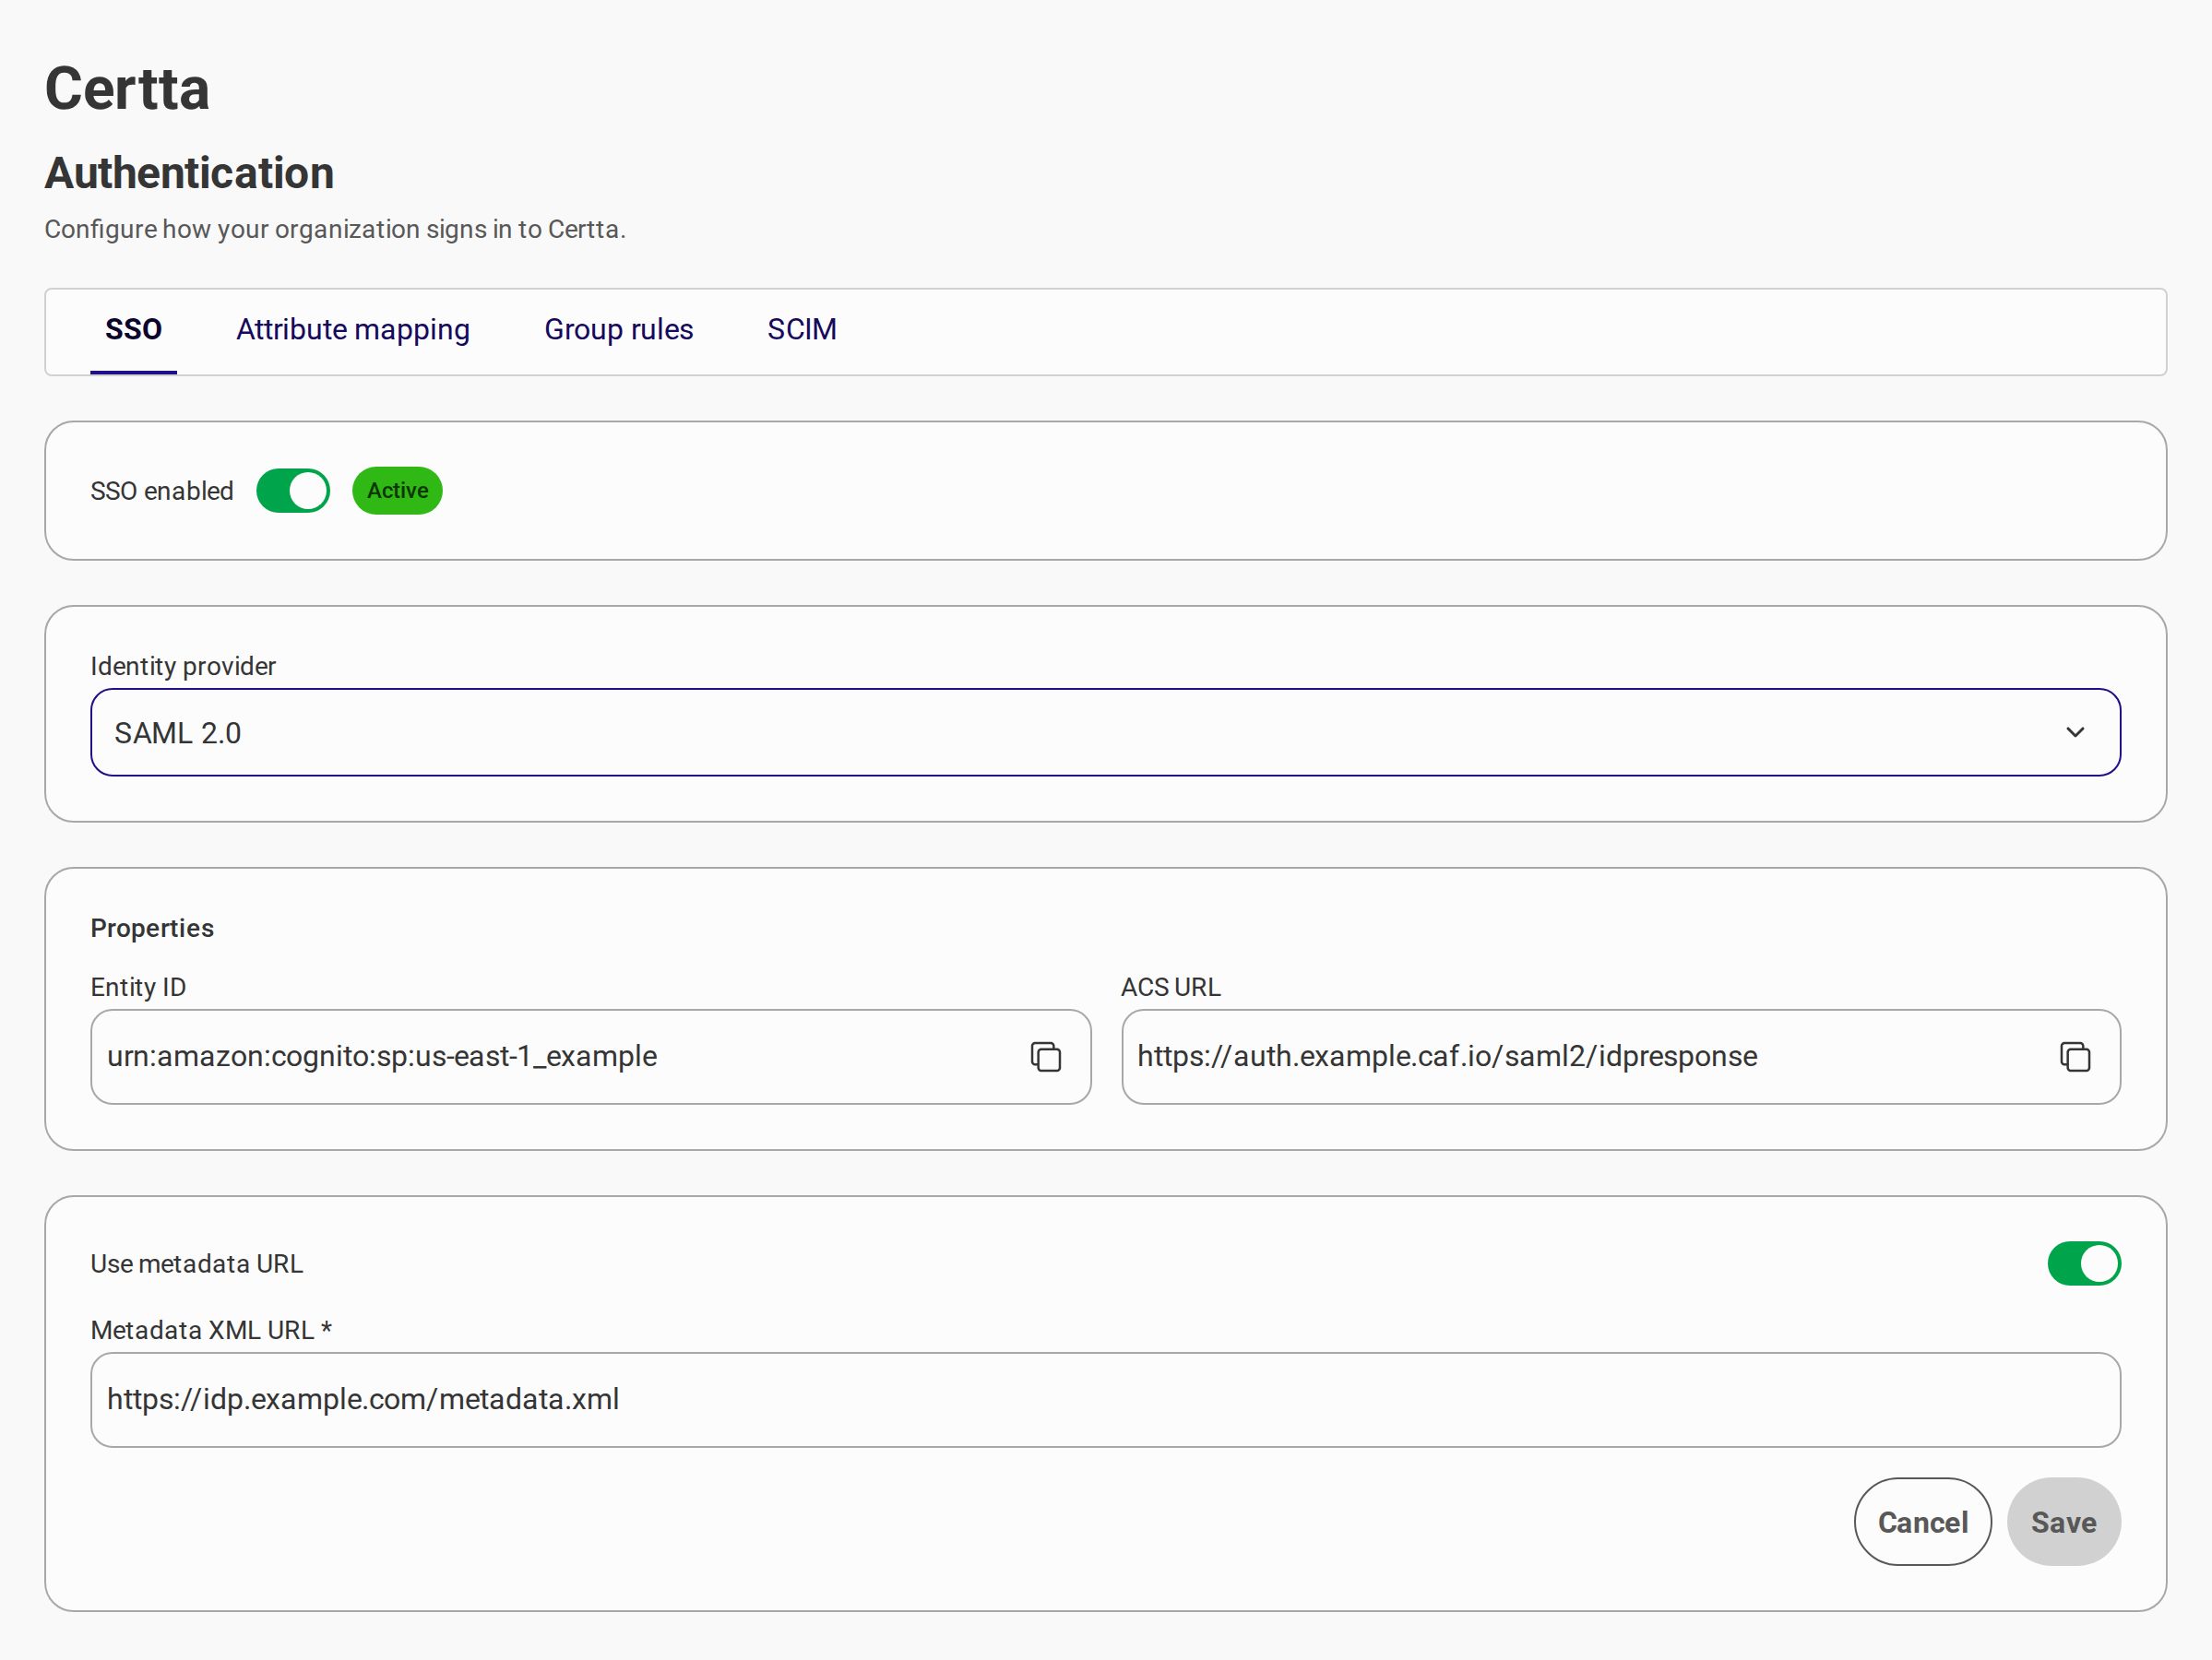
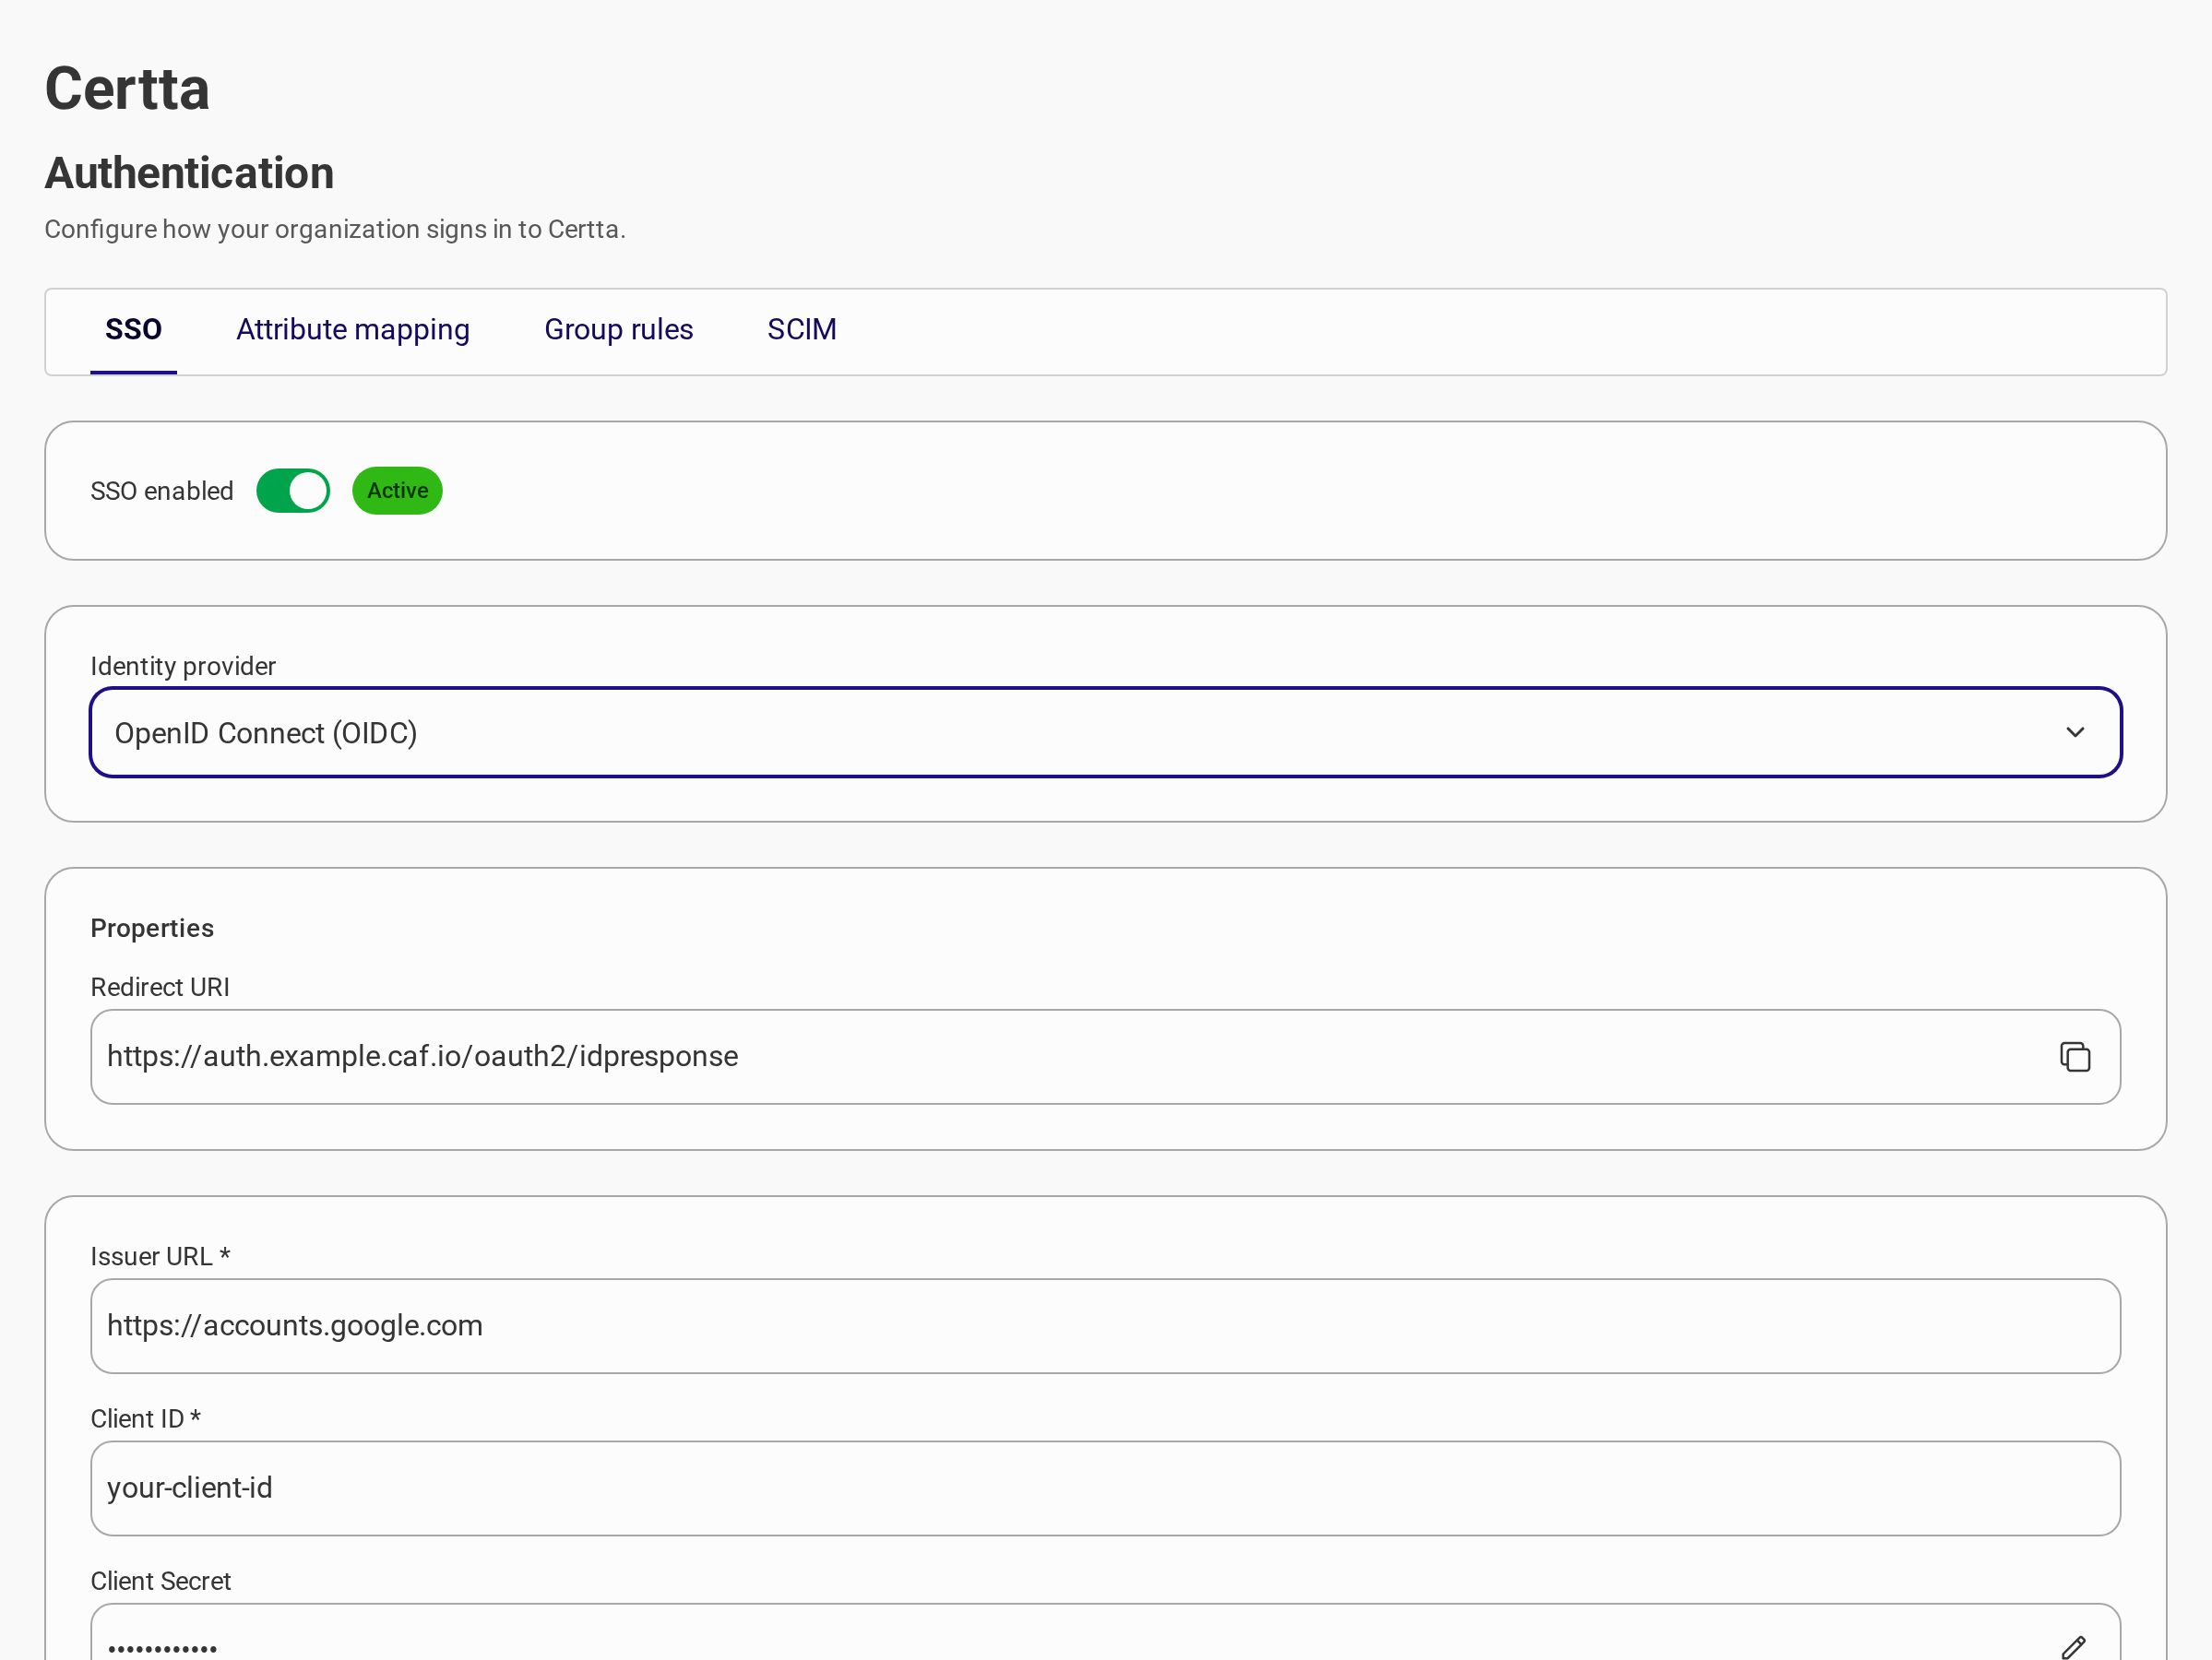
1. Turn on **SSO enabled**.
2. Select the identity provider protocol (**SAML 2.0** or **OpenID Connect (OIDC)**).
3. Copy the **Service Provider (SP)** values shown in **Properties** and register them in your identity provider (see provider guides below).
4. Enter the provider settings returned by your IdP.
5. Select **Save**.
{% tabs %}
{% tab title="SAML" %}
### SAML — SP values to copy into your IdP
| Organizations field | Use in provider as | Action |
| ------------------- | ---------------------------------------- | ------ |
| **Entity ID** | Entity ID / Audience URI | Copy |
| **ACS URL** | ACS URL / Reply URL / Single Sign-On URL | Copy |
### SAML — Provider values to paste in Organizations
| Organizations field | Value |
| ------------------------ | --------------------------------------------- |
| **Metadata XML URL** | Metadata URL from your provider (recommended) |
| **Metadata XML Content** | Full metadata XML (when URL is not available) |
Use the **Use metadata URL** toggle to switch between URL and pasted XML.
Provider setup guides:
* [Microsoft Entra ID (Azure AD)](/caf-docs/user-guide/organizations/sso-configurations/microsoft-entra-id.md)
* [Okta](/caf-docs/user-guide/organizations/sso-configurations/okta.md)
* [Auth0](/caf-docs/user-guide/organizations/sso-configurations/auth0.md)
* [Google Workspace](/caf-docs/user-guide/organizations/sso-configurations/google.md)
* [Generic Provider](/caf-docs/user-guide/organizations/sso-configurations/generic.md)
{% hint style="info" %}
The metadata URL or XML contains certificates and endpoints Organizations needs to trust your identity provider.
{% endhint %}
{% endtab %}
{% tab title="OIDC" %}
### OIDC — SP value to copy into your IdP
| Organizations field | Use in provider as | Action |
| ------------------- | --------------------------- | ------ |
| **Redirect URI** | Redirect URI / Callback URL | Copy |
### OIDC — Provider values to paste in Organizations
| Organizations field | Value |
| ------------------------ | --------------------------------------------------------------------------------------- |
| **Issuer URL** | Issuer URL from your provider |
| **Client ID** | Application client ID |
| **Client Secret** | Application client secret |
| **Request method** | `GET` (default) or `POST` — see [OIDC request method](#oidc-request-method-get-vs-post) |
| **Authorization scopes** | `openid email profile` (add `groups` when using group-based assignment rules) |
### About scopes
| Scope | Description |
| --------- | ------------------------------------------------------- |
| `openid` | Required for `OIDC`. Returns the user identifier. |
| `email` | Returns the member email address. |
| `profile` | Returns profile information (name, and related claims). |
| `groups` | Returns group membership when the provider supports it. |
{% hint style="info" %}
Separate scopes with a space. Example: `openid email profile`
{% endhint %}
{% hint style="warning" %}
Add the `groups` scope when you configure **Group assignment rules** based on IdP groups.
{% endhint %}
Provider setup guides:
* [Okta](/caf-docs/user-guide/organizations/sso-configurations/okta.md)
* [Auth0](/caf-docs/user-guide/organizations/sso-configurations/auth0.md)
* [Generic Provider](/caf-docs/user-guide/organizations/sso-configurations/generic.md)
{% endtab %}
{% endtabs %}
***
## Step 3: Configure Attribute Mapping
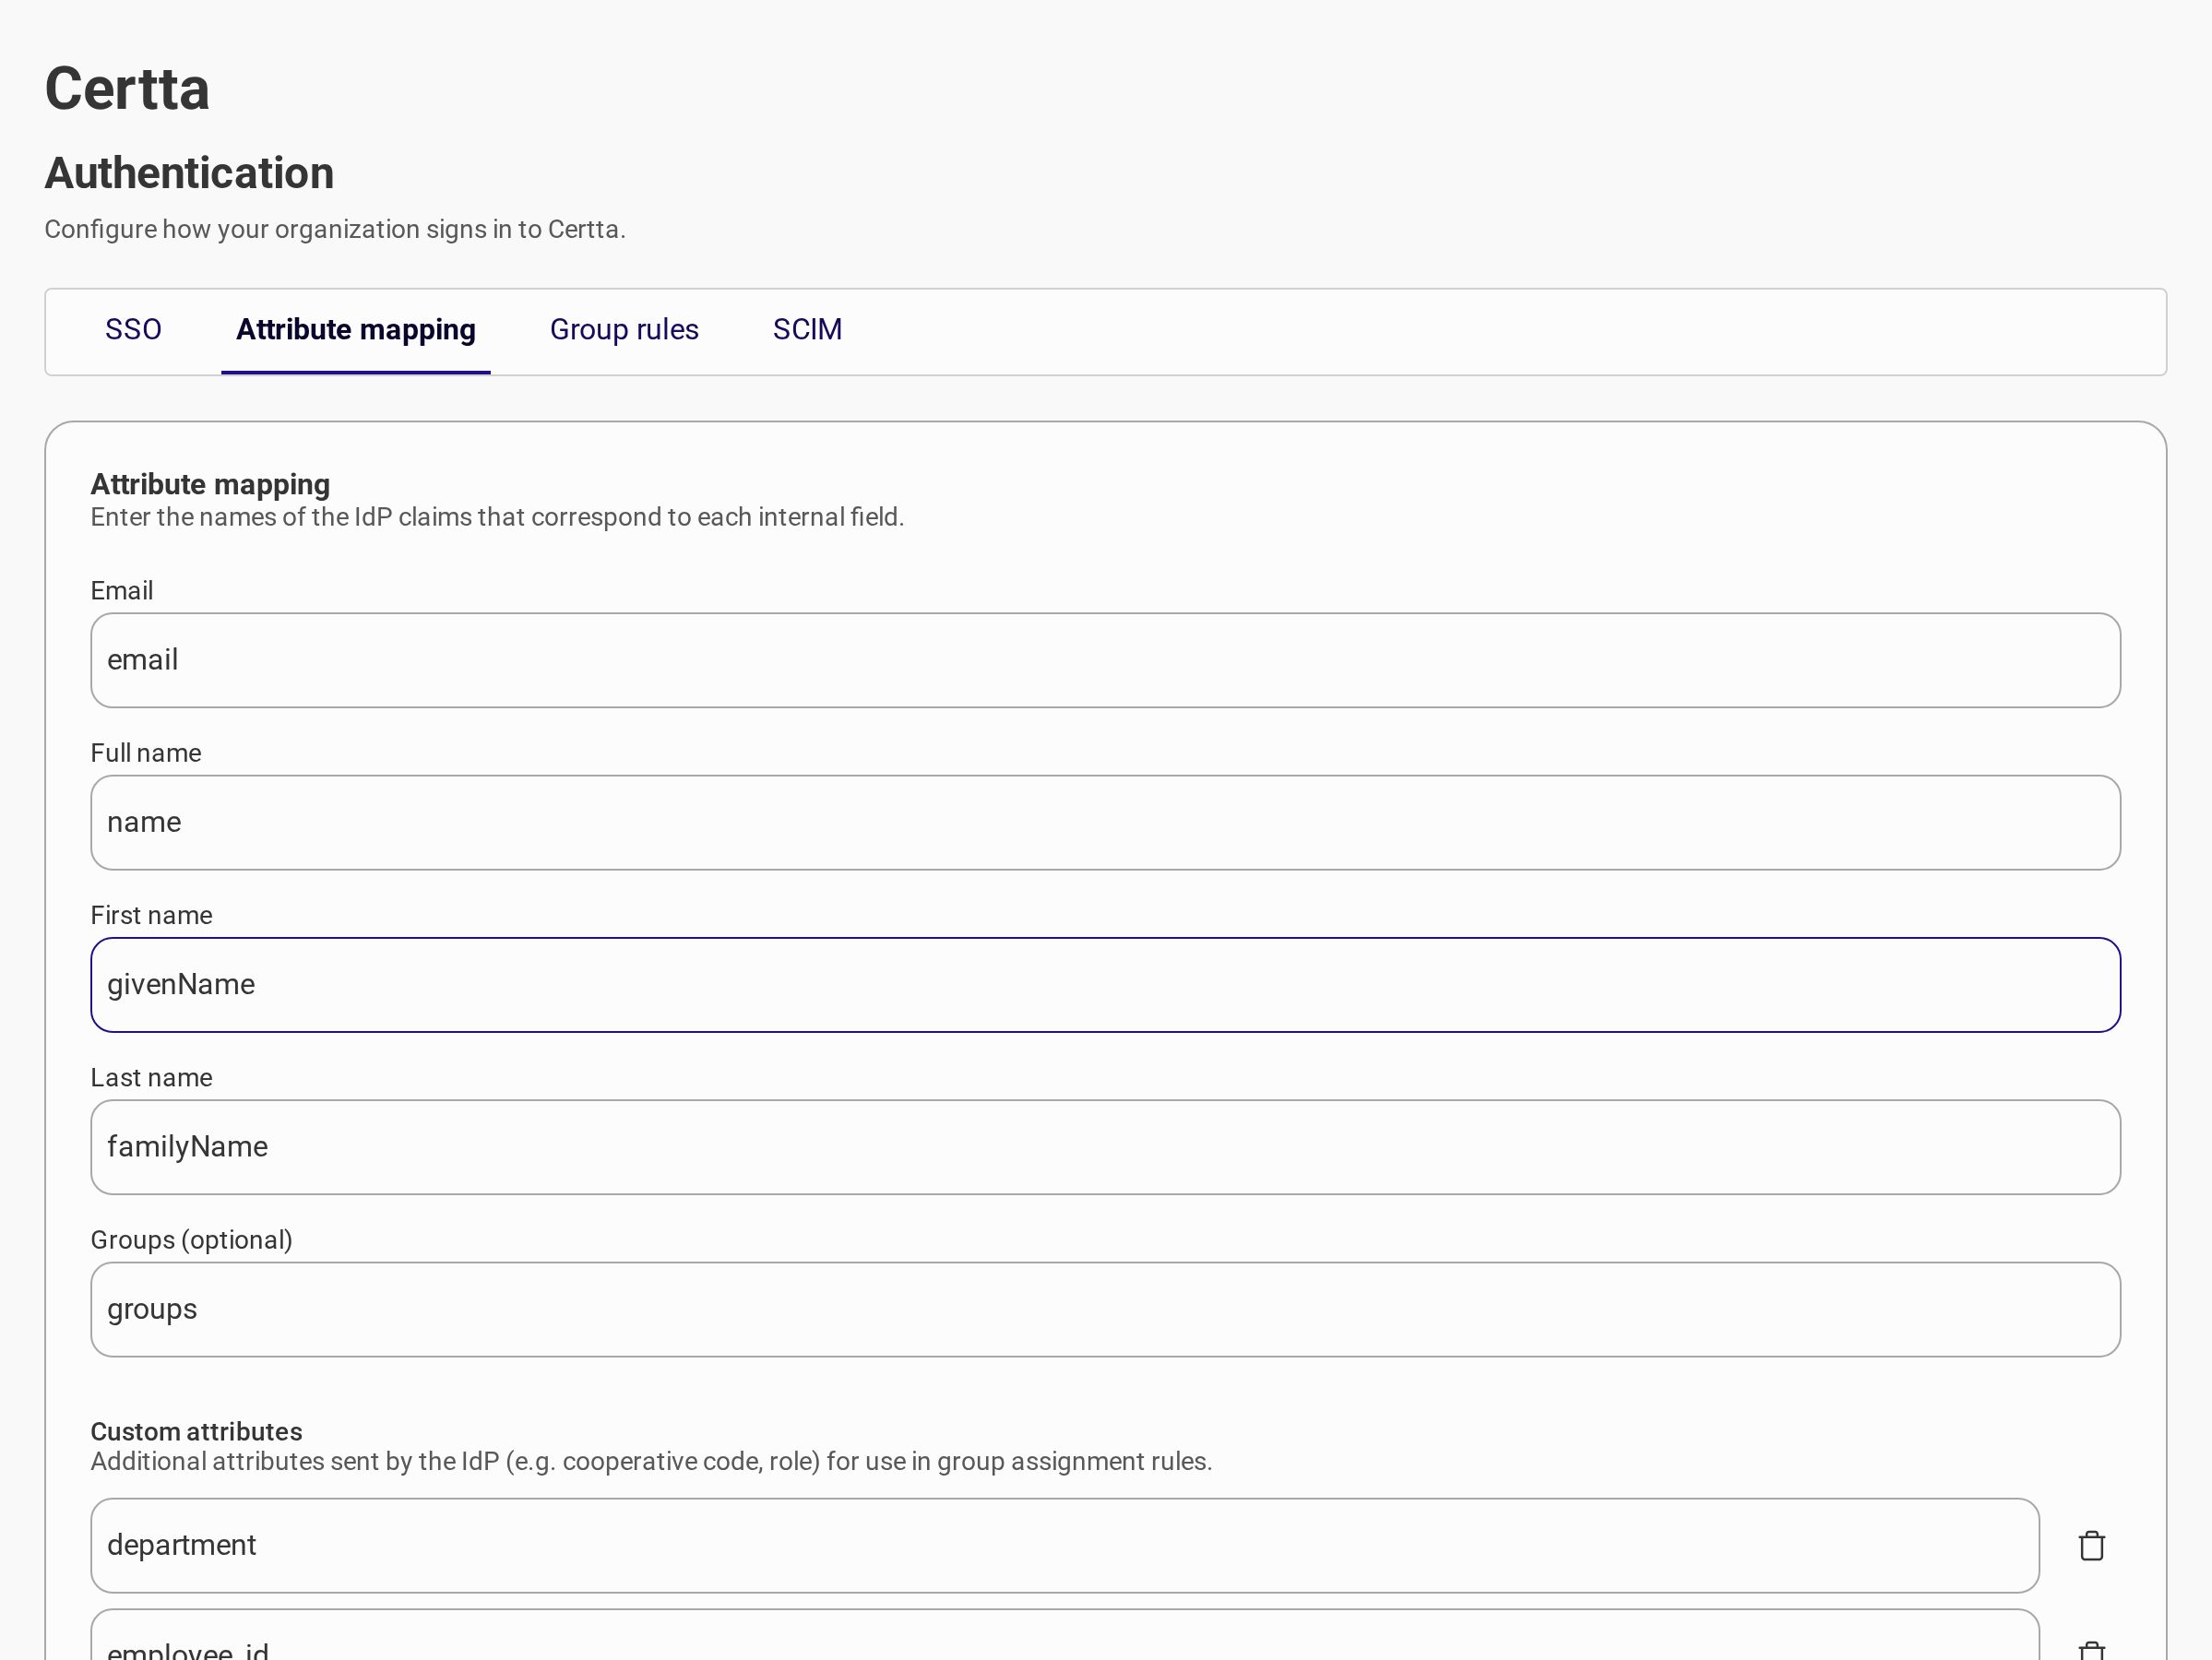
Open the **Attribute mapping** tab. Map IdP claim names to Organizations member fields. Names must match the claims or assertions your provider sends.
When you first configure SSO, Organizations pre-fills these defaults:
| Organizations field | Default claim name |
| ------------------- | ------------------ |
| **Email** | `email` |
| **Full name** | `name` |
| **First name** | `given_name` |
| **Last name** | `family_name` |
Update the values when your IdP uses different claim names (common for SAML providers — see the [Microsoft Entra ID guide](/caf-docs/user-guide/organizations/sso-configurations/microsoft-entra-id.md#configure-in-organizations)).
### Standard attributes
| Organizations field | Required | Description |
| --------------------- | -------- | ------------------------------------------------------------------------ |
| **Email** | Yes | Claim that contains the member email address. |
| **Full name** | Yes | Claim for the member display name. |
| **First name** | Yes | Claim for the given name. |
| **Last name** | Yes | Claim for the family name. |
| **Groups (optional)** | No | Claim that lists IdP groups (required for group-based assignment rules). |
### Custom attributes
Register additional IdP attributes (for example, `department`, `cost_center`) to use them in assignment rules. You can add up to **5** custom attributes.
Each name must match a claim your IdP sends. Custom attributes appear as condition options on the **Group rules** tab (with the **equals** operator).
{% hint style="info" %}
Confirm exact claim names in your provider documentation. SAML attribute URIs and OIDC claim names differ by provider.
{% endhint %}
***
## Step 4: Configure Group Assignment Rules
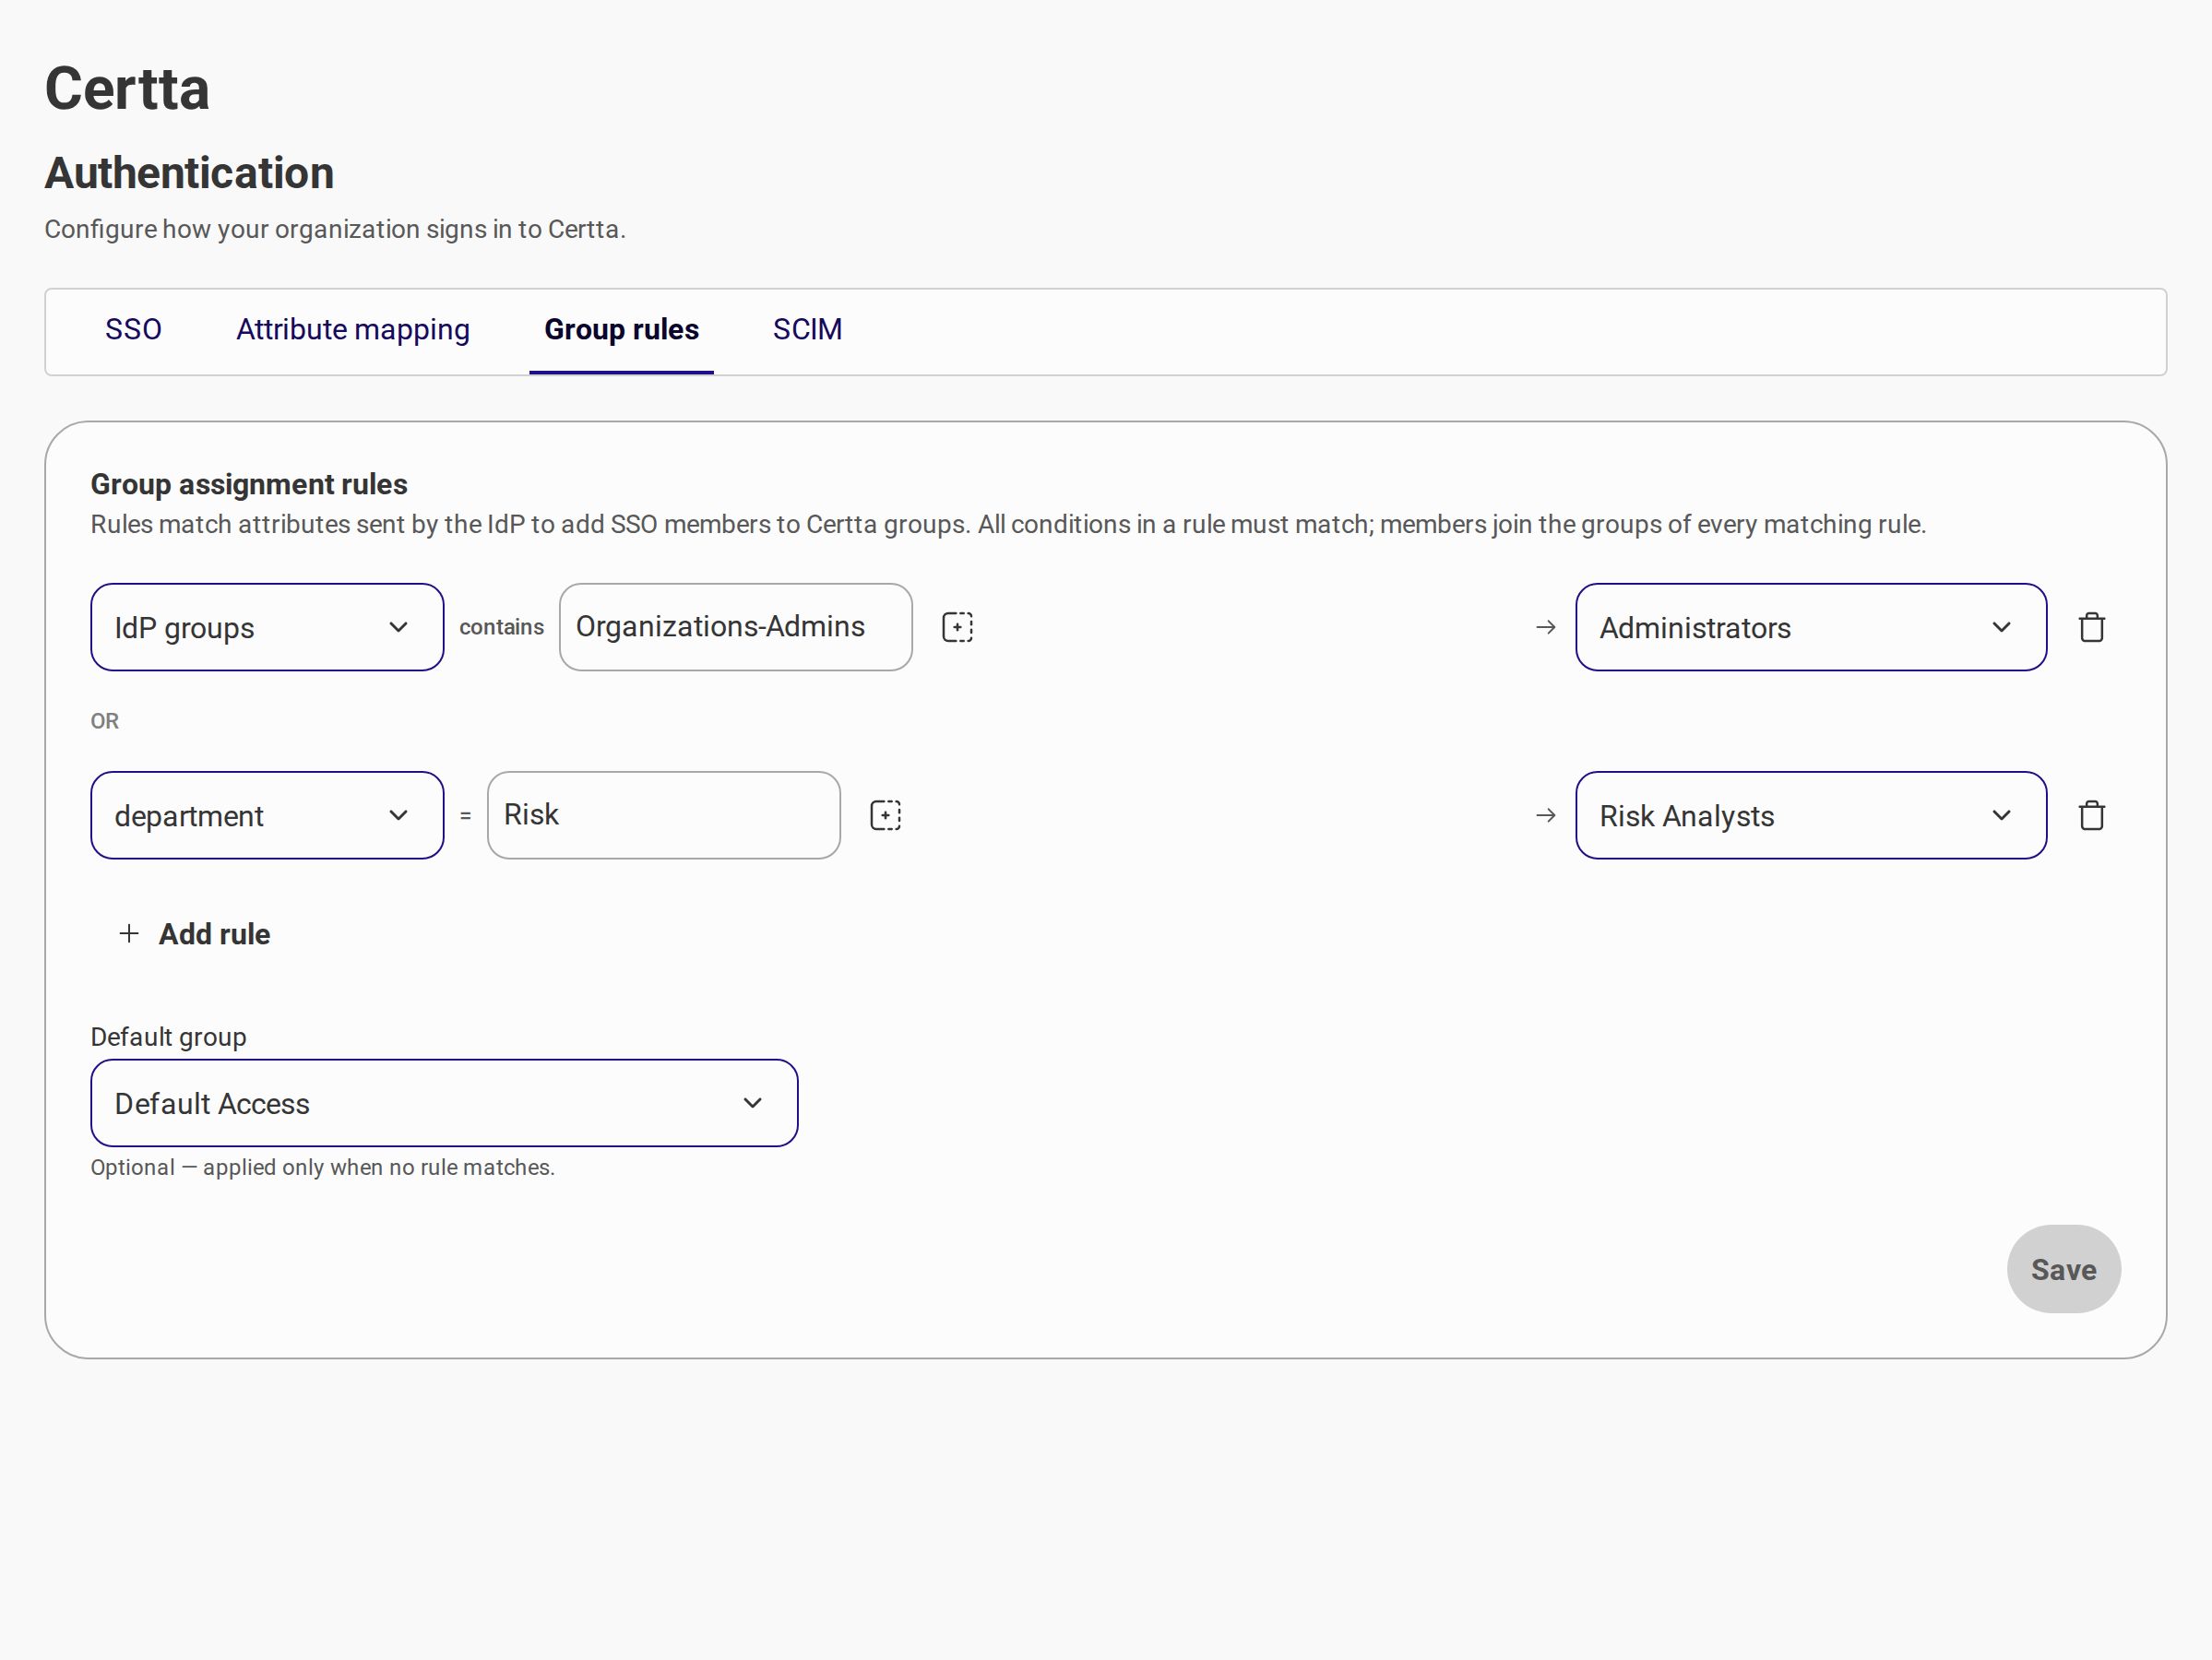
Open the **Group rules** tab. Rules assign SSO members to **organization groups** based on IdP attributes.
{% hint style="warning" %}
Create target groups in **People** → **Groups** before saving rules. Each rule must reference an existing organization group.
{% endhint %}
### How rules work
* Each **rule** has one or more conditions combined with **AND**.
* Multiple rules are evaluated with **OR** — a member joins every group whose rule matches.
* Conditions on **IdP groups** use **contains**; other attributes use **equals**.
* **Default group** is optional and applies only when no rule matches.
| Field | Required | Description |
| ------------------- | -------------- | -------------------------------------------- |
| **Rule conditions** | Yes (per rule) | Attribute, operator, and value from the IdP. |
| **Group** | Yes (per rule) | Target group when the rule matches. |
| **Default group** | No | Fallback group when no rule matches. |
{% hint style="warning" %}
Register the **Groups** claim (or custom attributes) on the **Attribute mapping** tab before creating rules that reference them.
{% endhint %}
{% hint style="warning" %}
When **SCIM** provisioning is active (a bearer token is generated on the **SCIM** tab), **Group assignment rules** are not used. Provision users and assign groups through SCIM and **People** → **Groups** instead. See the [SCIM Provisioning Guide](/caf-docs/user-guide/organizations/scim-provisioning.md).
{% endhint %}
***
## Member provisioning
How members are created on first SSO login depends on whether SCIM is active.
| Mode | SCIM token | First SSO login behavior |
| -------------- | ---------- | ---------------------------------------------------------------------------------------------------------------------------------------------------------------------------------------------------------------------------------------------------------------------- |
| **SSO only** | Not active | Organizations **creates the member automatically** (JIT provisioning) when the identity provider returns a valid email claim. |
| **SSO + SCIM** | Active | The member **must exist in Organizations** before login — provision the user through SCIM from your identity provider. Login is blocked until SCIM provisioning completes. See the [SCIM Provisioning Guide](/caf-docs/user-guide/organizations/scim-provisioning.md). |
{% hint style="info" %}
The email claim is required for SSO sign-in. Map it on the **Attribute mapping** tab and confirm your identity provider sends it in SAML assertions or OIDC tokens.
{% endhint %}
***
## Step 5: Save and Test
1. Save each tab after you change settings (**SSO**, **Attribute mapping**, **Group rules**).
2. Wait until SSO status shows **Active** (not **Provisioning**).
3. Open a private browser window (do not use the Super Admin session).
4. Go to your organization URL (for example, `https://{alias}.sso.caf.io`).
5. Select **Sign in with SSO** — this is the **member** login screen, not `/admin-login`.
6. Complete authentication at your identity provider.
7. Confirm you return to Organizations with the expected group access.
{% hint style="success" %}
**Done!** SSO is configured for your organization.
{% endhint %}
***
## Access model and linked products
SSO authenticates **members**. Access to Certta products linked to your organization is controlled by **groups**:
| Concept | Description |
| --------------- | ------------------------------------------------------------------------------------------------------------------ |
| **Group** | Bundles a **role** (permissions) and **linked account** access (which Certta product tenants the member can open). |
| **Member** | Signs in with SSO and inherits access through group membership. |
| **Super Admin** | Manages the organization via `/admin-login`; does not use member SSO. |
Configure groups in **People** → **Groups** before defining **Group assignment rules**, or assign members to groups manually / via SCIM.
After SSO login, members with access to multiple linked accounts may select a product from the access portal.
***
## Operations and maintenance
### Disabling SSO
Turn off **SSO enabled** on the **SSO** tab. The provider configuration is preserved, but members no longer see **Sign in with SSO** on the organization login page. Super Admin login at `/admin-login` is not affected.
### Switching between SAML and OIDC
Changing the protocol in **SSO** recreates the federation integration. After you save:
1. Update your IdP application with the new **Properties** values (Entity ID / ACS URL or Redirect URI).
2. Paste the updated provider settings in Organizations.
3. Review **Attribute mapping** — SAML claim URIs and OIDC claim names often differ.
4. Test member login in a private browser window.
### SAML certificate rotation
When your IdP rotates signing certificates:
1. Obtain the updated metadata URL or XML from your provider.
2. Open **Security** → **SSO** and update **Metadata XML URL** or **Metadata XML Content**.
3. Save and test member login.
You do not need to change Entity ID or ACS URL unless your provider instructs otherwise.
### OIDC request method (`GET` vs `POST`)
The **Request method** field controls how Organizations requests user attributes from the OIDC provider during token exchange.
| Method | When to use |
| -------- | --------------------------------------------------------------------------------------------------------------------------------- |
| **GET** | Default. Works with most providers (Okta, Auth0, Google, Keycloak). |
| **POST** | Select when your provider requires POST for the userinfo or attributes endpoint (some enterprise IdPs document this requirement). |
If attribute claims are missing after login, try switching the request method and test again.
***
## Validations and Error Messages
| Situation | Message / behavior |
| -------------------------- | ------------------------------------------------------- |
| Required SSO field missing | Field-level validation on save |
| Invalid URL or metadata | Provider configuration rejected |
| SSO still provisioning | Toggle disabled until provisioning completes |
| No attributes for rules | Banner prompts you to configure attribute mapping first |
| Invalid assignment rule | Save rejected with validation details |
***
## Troubleshooting
### Configuration errors (admin console)
| Problem | Probable cause | Solution |
| -------------------------- | ---------------------------- | --------------------------------------------------------------------------- |
| Redirect error | URI mismatch | Verify **ACS URL** or **Redirect URI** matches exactly in both systems |
| Invalid token (OIDC) | Incorrect client secret | Regenerate and update **Client Secret** in Organizations |
| Invalid certificate (SAML) | Expired IdP certificate | Refresh metadata URL or XML in Organizations |
| Claims not received | Missing scopes or attributes | Add scopes (OIDC) or map attributes in the IdP and in **Attribute mapping** |
| Invalid issuer (OIDC) | Wrong issuer URL | Confirm the URL at `/.well-known/openid-configuration` |
| Signature error (SAML) | Outdated metadata | Update metadata URL or XML in Organizations |
| Wrong group after login | Assignment rules | Review **Group rules** and IdP group claims (SSO-only mode) |
### Member login errors (sign-in screen)
These messages appear when a member selects **Sign in with SSO** at the organization URL.
| Message | Probable cause | Solution |
| -------------------------------------- | ------------------------------------------------------------ | ---------------------------------------------------------------------------------------------------------------- |
| Account not yet provisioned | SCIM is active and the user was not provisioned through SCIM | Provision the user via SCIM before the first SSO login |
| Account not found in this organization | Member record missing or identity not linked | **SSO only:** confirm the IdP sends the email claim. **SSO + SCIM:** verify the SCIM user exists and retry login |
| Account deactivated | Member is disabled in Organizations | Re-enable the member in **People** → **Members** |
| Login cancelled | User cancelled authentication at the IdP | Retry **Sign in with SSO** |
| Session expired | SSO flow interrupted or timed out | Retry **Sign in with SSO** |
| Login failed | Token exchange or provider error | Verify SSO configuration; check IdP assignment and callback URLs |
| Organization mismatch | Authentication targeted the wrong organization | Confirm the member uses the correct organization URL |
### Error codes (reference)
These query parameters appear in the organization URL after a failed member SSO attempt (`https://{alias}.sso.caf.io?error=...`). They map to the messages shown on the sign-in screen.
| Error code | User-facing message | Who resolves |
| ------------------------ | -------------------------------------- | -------------------------------------------------------------------------- |
| `sso_access_denied` | Login cancelled | Member — retry sign-in |
| `sso_state_mismatch` | Session expired | Member — retry sign-in |
| `sso_exchange_failed` | Login failed | Organizations admin — verify SSO config, IdP assignment, and callback URLs |
| `member_not_provisioned` | Account not yet provisioned | IdP admin — provision user via SCIM before first login |
| `member_not_found` | Account not found in this organization | Organizations admin — verify SCIM/JIT provisioning and email claim mapping |
| `member_inactive` | Account deactivated | Organizations admin — re-enable member in **People** → **Members** |
| `organization_mismatch` | Organization mismatch | Organizations admin — verify organization URL and SSO configuration |
{% hint style="info" %}
Error codes appear on the **member** login page only (`https://{alias}.sso.caf.io`). The Super Admin login at `/admin-login` uses email and password and does not display these SSO error codes.
When the platform cannot determine a specific failure, the sign-in screen shows **Login failed** (`sso_exchange_failed`) instead of a member-specific code.
{% endhint %}
***
## Glossary
| Term | Definition |
| ----------------------- | --------------------------------------------------------------------------------------------------------------------------------------------------------------------------- |
| **SSO** | Single Sign-On — one corporate login for Organizations and other apps. |
| **SAML** | Security Assertion Markup Language — XML-based federation standard. |
| **OIDC** | OpenID Connect — identity layer on top of `OAuth 2.0`. |
| **IdP** | Identity Provider — system that authenticates users (Entra ID, Okta, and others). |
| **SP** | Service Provider — Organizations, the application that consumes federation. |
| **Entity ID** | SAML identifier for the Organizations service provider. |
| **ACS URL** | SAML Assertion Consumer Service URL where the IdP posts assertions. |
| **Metadata URL / XML** | IdP federation document with endpoints and certificates. |
| **Issuer URL** | OIDC provider base URL used for discovery and token validation. |
| **Scopes** | OIDC permissions that define which user information is shared. |
| **Claims / assertions** | User attributes returned by the IdP after authentication. |
| **JIT provisioning** | Automatic member creation on first SSO login when SCIM is not active. |
| **SCIM** | Protocol for identity providers to provision users into Organizations before login. See [SCIM Provisioning Guide](/caf-docs/user-guide/organizations/scim-provisioning.md). |
---
# Agent Instructions
This documentation is published with GitBook. GitBook is the documentation platform designed so that both humans and AI agents can read, navigate, and reason over technical content effectively. Learn more at gitbook.com.
## Querying This Documentation
If you need additional information that is not directly available in this page, you can query the documentation dynamically by asking a question.
Perform an HTTP GET request on the current page URL with the `ask` query parameter, and the optional `goal` query parameter:
```
GET https://docs.caf.io/caf-docs/user-guide/organizations/sso-configurations.md?ask=&goal=
```
`ask` is the immediate question: it should be specific, self-contained, and written in natural language.
`goal` is optional and describes the broader end goal you are ultimately trying to accomplish on behalf of the user. GitBook uses it to tailor the answer towards what is most useful for that goal.
The response will contain a direct answer to the question and relevant excerpts and sources from the documentation.
Use this mechanism when the answer is not explicitly present in the current page, you need clarification or additional context, or you want to retrieve related documentation sections.